
At some point when you start a journey into health and fitness you’re likely to encounter the beloved and maligned push up. It’s a fantastic exercise for men and women with numerous benefits. Most people, though, don’t do them well or can’t do them at all. If you’re one of these people then you’re in luck. This guide will help you transform from floppy fish, to doing your first push up, and on to becoming a perfect push up machine. In addition to being a super convenient exercise with endless variations, push ups are incredibly beneficial for anyone looking to improve their upper body strength, look, better, perform better, and be all around healthier.
CLICK THE BUTTON BELOW to download a First Push Up Training Guide ↓↓↓
Just about every branch of the military includes push ups as part of their physical fitness standards because your ability to do push ups is a key indicator of your overall fitness and work capacity. A recent study from the Harvard School of Public Health demonstrated that there was even a reduction in cardiovascular incidents for individuals that could do more push ups. Correlation isn’t causation, but hey maybe all the things that help us do the push ups (decent weight to strength, muscular endurance, cardiorespiratory fitness, and more) also help us to stay pretty dang healthy overall.
Finally, being able to do push ups well means you can take your workout anywhere you want to, or stay in shape easily with home workouts. Your arms, shoulders and chest will make t-shirts and tank tops look better. And you can be the star of your own instagram training montage just like your favorite 80s movie. As you go through this guide we’ll help you elevate your push up skills by going over:
Execution of a proper push up
Getting started right away with elevated push ups
A set up ritual to get into the proper position every time
How to strengthen the core to fix problems with plank during push ups
Strategies and cues for fixing common issues with shoulder strength
Exercises that can help improve other push up pitfalls
How to incorporate these exercises into your workout routines
Proper Push Up Form
Before you start knocking out pushups you have to get set up well with a plank. This isometric exercise is where you start creating tension from head to toe so that your body moves as one unit when you do a push up. A good plank position requires you to get tight from head to toe so that your body creates a straight-ish line from the ankles to the shoulders.
Your back should be flat and not sagging, your hips are level so your butt doesn’t tilt up like a duck’s butt, and your shoulder blades are held flat against your upper back and not shrugged up to your ear lobes.
The hands should be placed directly under the shoulders, slightly wider than the chest, with the fingers pointed straight ahead or slightly outward. Grip the ground and squeeze with your fingers as if you were going to slowly pull yourself to the ground. The tension in your hands will help you to keep a stronger shoulder position and push yourself back up with more force.
Keep your eyes and head facing straight ahead to the floor or slightly upward. Looking down toward your toes, will make your forehead get in the way and reduce your range of motion. It can also mess with your shoulder position.

Lower your chest to the floor keeping the elbows pointed back and out from the body at a 45° angle so that your arms and torso form an “arrow” pointing toward your head. Your arms and elbows should not stick straight out from your shoulders and neck like “T” shape. When the chest is a few inches from the floor and your arms are parallel to the floor, bring the descent to a stop and press your way back up to the starting plank position with your elbows fully locked out.
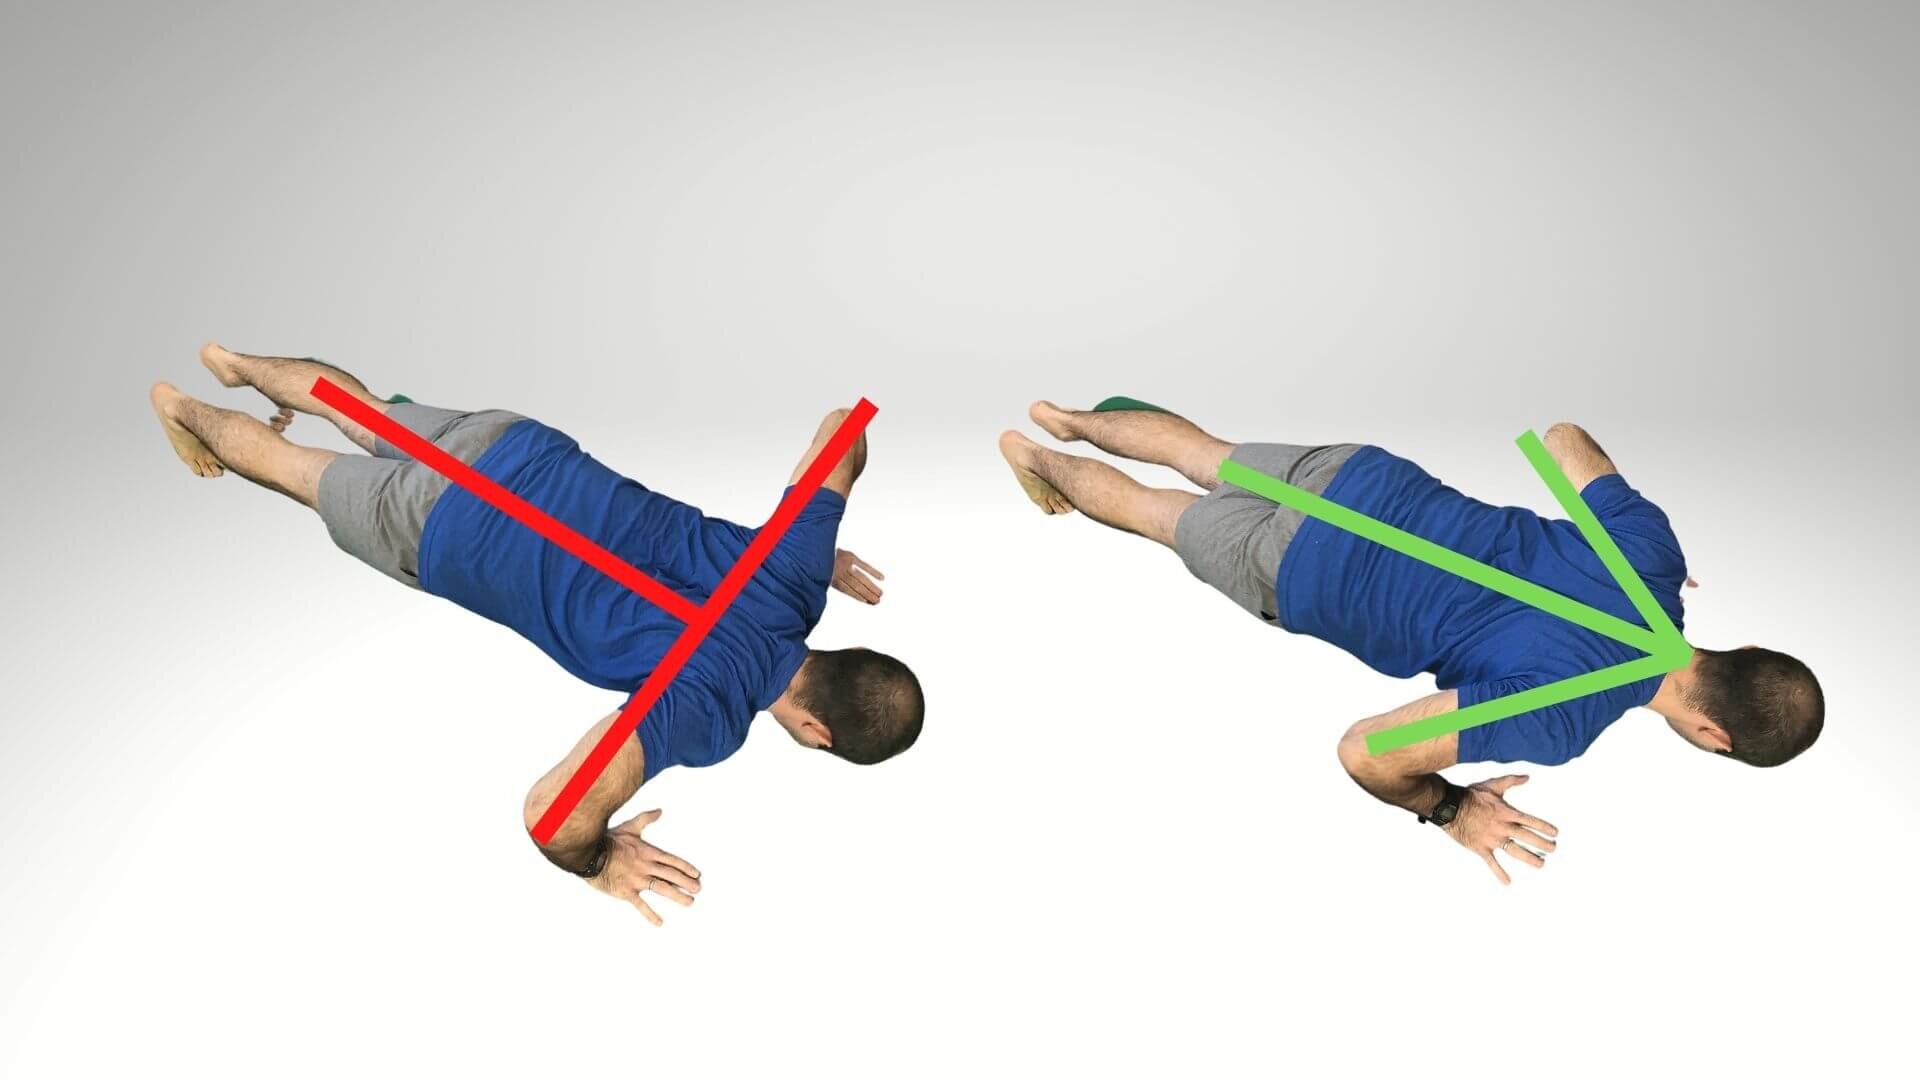
Demonstrating the difference between flaring the arms out into a “T’ position during a push up and keeping the arms pointed back at 45° for an arrow position when doing a push up.
Perfect Push Up Set Up Ritual
To start setting up for your perfect push up position, begin on all fours with your hands shoulder width apart and knees on the ground. Make sure your hands are directly under the shoulders with your fingers pointed up or slightly out. Not inward.
Push into the ground with straight arms. Push like you’re sending roots down into the ground and supporting something on your back. Once you feel the tension through your upper back and armpits, reach back with one leg and plant your toes so they are dorsiflexed (bent back).
With your toes planted on one leg begin to flex all the muscles of that leg and brace your abs. Once everything is tight through the leg and core, reach back and plant the other foot to brace through both legs.
In this top position you should be squeezing your legs, butt, and bracing your abs to make your body rigid from head to toe. This set up routine will make certain that you position yourself with your hands under your shoulders and everything tight and ready to go.

Every time you get set up in the top position of a pushup you’re in a plank and you have to maintain that tension through each repetition so that your body stays rigid. Otherwise it looks like you’re doing inappropriate things to the floor.
It’s important that your setup for your plank and push up is the same each time you do it. Start getting used to the same ritual or pattern so you know you’re set up in the plank perfectly each time.
When doing elevated plank and push up variations continue to use the set up ritual, but alter it by placing your sternum to the elevated surface between your hands first. Then reach back with one leg and press yourself up with the support of the second leg.
Finally reach back with the second leg so you are tight head to toe and in a great plank position for your push up at any height.
Practice Push Ups Everyday. Not on your knees.
To start getting better at doing push ups you have to start doing push ups. Most people usually start by doing push ups with the knees on the floor. The problem with this is that it does a poor job of developing the proper strength and skills to keep the body tight for a full push up.
Even if you are able to do 30+ push ups in a row from the knees, you may not be able to progress to a single full push up. Setting up with your hands on a higher surface will make push ups easier, but still require you to keep tension in your midsection and legs.
Begin by finding a suitable surface that is high enough for you to perform multiple reps of push ups at a time without too much difficulty. It could be a bench, plyo box, smith machine, park bench, coffee table, kitchen table, counter top or even the wall.
Make sure that your elevated push up position allows you to go through a full range of motion (sometimes a challenge with push ups against a wall.) In the lowest position of your push up you should maintain the arrow position previously mentioned and your elbows should form a 90° angle or less, since you cannot judge them as parallel to the floor.
Now start practicing elevated push ups and treat it like practice. Don’t try to exhaust yourself and make it a flop-fest. Focus on keeping tension through the entire body, good elbow position, and doing only as many repetitions as you can so you still have 3-4 repetitions in reserve. Do not go to failure. Be opportunistic and practice multiple times a day and everyday. This helps you to improve the motor skill through frequent repetition.
When you find you can do 10 or more smooth and controlled repetitions at a given height, find another surface that is a bit lower. Continue to keep at least 1-2 repetitions in reserve with the more challenging position. Over time you’ll get closer and closer to doing your push ups on the floor.
That’s how it should work ideally, but you may find along the way you need to do other exercises to strengthen specific push up skills. No problem, though. In the next few sections I’ll break down the most common issues with keeping good push up form as you progress, and provide you with exercises that can help you correct them or avoid them.
Fix A Drooping Plank
Using the set up routine outlined above for your push ups can fix a lot of problems, but it’s not always full proof. The most common issue in the plank for a push up is an arched and droopy lower back. This places more pressure on the lower back which can be uncomfortable or painful, but it also makes your belly reach the floor before you’re able to do a full range of motion push up. The more time you spend practicing push ups like this the more you reinforce that this weak core position is your body’s standard position, which can cause issues with other exercises beyond the push up like squats and deadlifts.

Demonstrating the difference between a droopy or sagging plank and a proper plank position with suport for the lower back.
Before you assume you need lots of other exercises, redouble your efforts to flex the muscles through the leg and the abs for support in your plank. It should feel as though you are bringing the bottom of your ribs and the top of your hips a little closer together as you squeeze your abs. If you have a hard time bracing through the legs try squeezing a yoga block or pillow between the legs to help you create more tension in the lower body.
Planks From the Knees.
While I do think it’s better to practice push ups from a full plank position, sometimes it just makes things easier to start from the knees. Doing push ups from the knees isn’t just easier for the arms, but it can be a helpful position to improve your plank position.
When your knees are on the ground initially your plank will feel easier because you’re supporting less total bodyweight in that position. But if you’ve been struggling to brace your core and flatten your back out in a full plank, kneeling may allow you to do just that.
By bringing the bottom of your ribs and the front of you pelvis slightly closer together you can finally flatten your back out. Getting into this corrected position for the plank can make the kneeling plank suddenly feel much more challenging than even the full plank position if you weren’t bracing your core as well.
Get better at the kneeling planking position to improve all your other push ups.
Push Ups From the Knees… OK.
Sometimes you just can’t find a good elevated surface for practicing your push ups and doing push ups from your knees is the best option. There’s nothing wrong with that.
Once you get into the proper plank position outlined above, doing push ups from the knees is a great way to practice push ups regularly. The proper plank position will help you continue to get better at the bracing you will need to get to a full proper push up.
Push ups from your knees require you press up less of your total body weight, so this position can allow you to practice slow and controlled repetitions. These slower repetitions can help you to improve your shoulder and elbow positioning to be more like an arrow as explained earlier.
When doing kneeling push ups you could keep adding repetitions, but sets beyond 15 reps may not do a lot to help you transition to elevated push ups or full push ups. Instead you can think of slowing down your repetitions as you lower yourself, pressing up as hard and fast as possible, or adding isometric holds to the your push ups to increase your strength.
Dead Bugs
Dead Bug variations are fantastic exercises to help you strengthen the midsection and learn to keep your midsection tight while doing the plank. They challenge our ability to keep the ribs down and the pelvis up in the front, as if we were bringing the ribs and hip bones slightly closer together. This supports the low back from underneath to keep your torso from sagging in the middle.Set up for the dead bug exercise by lying down face up on the ground. Hold your hands straight up over your shoulders and lift your feet off the ground. Your knees should be straight up over the hips.
Press your back to the floor and keep it there
Extend the opposite arm and leg and hold
Exhale fully and forcefully like you're blowing up a balloon
After you exhale, pull your arm and leg back up to the starting position.

Perform 5-15 repetitions each side. Each rep should take 2-3 full seconds. If you have trouble keeping your back flat to the floor place one foot flat on the floor while you extend the other leg. If the exercise is still too challenging try working with only one arm at a time and both feet on the floor.
Glute Bridge
Glute bridges allow you to practice the tension you need in the glutes, hips, and hamstrings to keep a good plank position. With a couple of small adjustments they can also teach you how to maintain good tension through the armpits and shoulders for push up as well as the inner thighs and the legs.
Set up for the glute bridge by lying down face up on the ground with your knees up and feet flat on the ground, shoulder width apart. Hold your hands up above your chest, press one hand down on top of the other and squeeze so that you create tension all the way up your arms to your armpits.
Scoop your pelvis and tighten your abs
Press down into the heels and feet to lift the hips
Exhale forcefully and fully then return to the ground slowly

You can perform the glute bridge for 10-15 repetitions, or you can hold the top position and continue to breathe in and out while squeezing one hand on top of the other for 30-60 seconds. You should feel tension from your armpits to your midsection and down the backside of your glutes and legs. If you have a hard time keeping your legs tight in the push up try squeezing a yoga block between your thighs here as well.
Bird Dogs
The bird dog is like the dead bug, but flipped over so that you are on your hands and knees. It will help you learn to keep tension in the midsection and stabilize through the hips and shoulders. Begin by pressing into the floor with both hands until there is tension in the upper back and shoulders.
Press the hands down into the ground so the upper back is tight
Extend the opposite arm and leg apart and hold
Exhale fully while squeezing the abs and pressing away from the floor

After you exhale and hold, return to the starting position and perform all the 5-15 repetitions on each side. Each repetition takes 2-3 seconds to perform well. If you have trouble resisting rotation, pressing into the ground the entire time or fully extending the leg, keep both hands pressed down to the ground.
Bear Squats
The bear squat helps you strengthen the shoulders, midsection, hips and legs, so that you learn how to create tension and brace through all of them in the push up.
Set up on your hands and knees like the bird dog exercise to start but with the hands slightly higher so they are shoulder width apart and in front of your face or forehead.
Lift the knees an inch or two off the ground
Rock back toward the ankles by pressing back against the floor with the arms
Press back out with the legs so you are back to a push up position

Pause briefly at each end of the repetition to brace through the legs, midsection, and press hard into the floor with the arms. Perform 5-15 repetitions at a time and remember to breathe.
Stationary Inchworm
The inchworm exercise also strengthens the shoulders and the midsection and helps you to keep everything tight as you move through the shoulders. Start by standing upright and bracing through the midsection. Fold over at the hips and place your hands on the ground out in front of you. Bend the knees somewhat if necessary.
Keep the midsection tight and walk the hands out so that you reach a push up plank position and farther if possible
Walk the hands back toward the feet, keeping the legs straight and raising the hips in the air

Repeat this exercise for 5-10 repetitions at a time pausing briefly at each end without standing up. Do not walk the hands so far that you lose core tension and the back arches downward.The goal is to use your midsection to support the low back throughout the entire movement. As you get stronger with the exercise walk the hands a little further.
Stronger Planks for Push Ups From Lower Positions
All of these exercises will help you get stronger in your plank position so that you can gradually lower your plank and push up from an elevated position to the ground. As your core strength improves, you can use different objects around your home. If you began with a countertop you may be able to move down to the edge of a table or the arm of a chair or couch. Then as you continue to improve you can move down to something lower like an ottoman or a coffee table. In the gym you may use different height boxes or benches. Work lower gradually as your core, shoulders, and arms allow with good form.
If you’re not “feeling” these core exercises, it could be that you need to re-focus on how you are squeezing each muscle or forcefully exhaling. Do not underestimate how much your breath can improve tension and strength if you use it well.
Fix Flared Elbows During the Push Up
A common problem you may experience as you work toward your first push up is elbows that flare straight out like a “T” instead of the “arrow” position discussed earlier.When the elbows are flared straight out to the sides the shoulders are likely shrugged back up by the ears and your hands possibly turned inward. All this places more stress on the shoulders, elbows and neck.Remember the first thing in the push up set up ritual is driving your hands down into the ground so you feel tension through the upper back and armpits. If you really hammer the set up ritual it will help reduce the tendency to flare your elbows in a “T” position, because it helps you engage the muscles of the upper back and armpits while getting your hands into proper position.
If your core is staying strong, but it feels impossible to keep the elbows below the shoulders in an arrow position there are exercises you can do to strengthen the shoulders and upper back. But it can also just take some practice or cueing to maintain the “arrow” position.
Visualizing the movement
Place one palm down against the top of the other hand squeeze hard so that you feel tension up into your armpits and latissimus dorsi muscles. These muscles need to get engaged to help keep your elbows in a good arrow position during push ups.
Once you’re set up for the push up, grip the floor and visualize pulling yourself toward the floor during the descent. This helps to get the upper back engaged and control the movement.You can also visualize pressing the floor apart to drive the elbows back, or if the elbows collapse inward try squeezing the floor together through the press to keep the elbows out from the sides of the torso. If that doesn’t work well work on some of the following exercises and drills to help keep your elbows from flaring out.
Negative-Only Push Ups
A great way to start practicing keeping the elbows down is with negative only push ups, which can be done elevated or to the floor. Set up into a straight arm plank position, tense up your armpits, and then slowly lower yourself to the ground or an elevated surface while keeping your elbows in an arrow position. When you reach the bottom you use your legs or knees to get yourself back to the top position. Each repetition should take 2-10 seconds to lower yourself down. Get slower as you get stronger until you can start adding in pauses at different positions. When you have super slow control at one height move to a lower position.

Prone Cobra
The prone cobra strengthens the lower trapezius which helps you keep your shoulder blades held low so your shoulders stay pulled down from the ears. When the lower trapezius is weak the upper trapezius is often tight and will pull the shoulders up to help stabilize, which flares the elbows out. Lie down on your belly with your palms down and at your sides by your pockets. Your thumbs will be pointing away from your body.
Tighten the midsection against the floor and look up slightly
Rotate the elbows back and together so that the thumbs rotate up away from the floor
Lower the shoulders back down and let the thumbs and palms follow.

Keep the shoulders pulled down away from the ears and hold each repetition and squeeze lightly as you rotate the elbows in and the thumbs up. Do not squeeze too aggressively or other larger muscles will try to do all the work. You may find yourself arching up a little. Keep your abs braced to minimize the back arching motion. Perform 10-15 repetitions for 2-3 sets each day.
Batwings
The batwing exercise will help you get the muscles of your armpits (lats), middle and upper back (rhomboids) engaged to also help keep your shoulders from raising up to your ears and causing your elbows to flare out like a “T”. Lie face down on a bench with two light dumbbells on the floor so that you can easily reach them with your thumbs and palms facing each other.
Brace your midsection against the bench.
Pull the dumbbells up so your arms and elbows are just slightly behind the torso and hold for time.
Keep tight through your armpits and pull the shoulders down and back.

Continue to breathe and squeeze the shoulders back for 10-30 seconds at time. Do not pull the elbows so far back the shoulders roll forward. The goal is to pull the shoulders back and pinch the shoulder blades low and together.
Serratus Wall Slides
The serratus anterior is a muscle that helps keep the shoulder blade held tight to the back of the rib cage while you are in a push up position. When it gets weak it is often said that the shoulder blades “wing” out or protrude from the upper back. When this happens the upper trapezius muscle will usually dominate and provide stability by shrugging the shoulders up by the ears and then the elbows flare out once again.Set up facing a wall from afoot or two away. Place a foam roller horizontally against the wall in front of the nose, and press the wrists against it to hold it in place.
Brace your midsection and lean toward the roller and pressing into it
Press the elbows up rolling along the roller until it reaches close to the elbows
Pull the elbows back down until the roller gets back to the wrist

Perform 10-20 repetitions at a time. Keep pressing forward against the roller so your shoulder blades are pressed tightly against your upper back. Visualize pressing from the armpits up to the elbows. You should feel this working under the shoulders and along the ribs. That’s your serratus anterior.
Other Helpful Exercises For Push Ups
The exercises above are great for fixing a body that droops in the middle or elbows that flare out to a “T”. But sometimes you may need exercises that simply help you bridge the gap when moving to from an elevated push up to a lower position. The following exercises can help you bridge these gaps and continue to get stronger in your push up.
Push Up to a Block
Pacing a block below the chest can allow you to train the push up to a specified range of motion each and every repetition. A yoga block is great for creating a low push up position for a full range of motion, or if turned on its other side can provide a reduced range of motion to practice the push up to the floor with a greater emphasis on the triceps.
Place the yoga block directly below the chest
Set up and lower the sternum to touch the block
Do not rest on the block and press your way back to the starting position

When you lower your chest to a block in the lower position you can pause and maintain tension through the arms and torso. This isometric hold can help you develop the strength to stop in the bottom position and then press back up. A taller yoga block will allow you to focus on a partial range of motion through the arms to focus on strengthening the triceps.
Rocking Push Up
The rocking push up is a helpful exercise when you are not able to hold a perfect plank position from the ground or push yourself up from the bottom of a push up.
Set up on your hands and knees and rock back as far as you can and stretch your arms overhead as far as you can.
Brace your midsection, rock forward, and lower your torso so your chest comes between both hands.
Press back through the arms while keeping your midsection tight and pulling the hips back toward the ankles again.

This exercise lends itself well to performing higher repetitions for more practice and conditioning of the arms and midsection. It will help you practice lowering your chest down over the hands, but rocking back makes it a bit easier to press back up to finish the motion.
Crawling
Crawling helps you develop strength through the arms, core, and shoulder stability. It also helps develop coordination so that you are able to keep parts of your body tight while moving through the arms, similar to keeping tension throughout the body while moving the arms for the push up.
Setup in a quadruped position with your knees just off the ground and your back level.
Move the opposite arm and leg forward so that your knee moves closer to the forearm and the hand is planted forward overhead on the ground.
Keep tight in the midsection and alternate sides so that the knee always moves close to the forearm when planting the foot.

Crawling will help build strength and muscular endurance. Rather than trying to move quickly, keep the movements smooth and slow to reduce strain on the wrists. Additionally spend more time with your opposite arm leg off the ground so that you're working harder. As you get stronger crawling try changing it up to crawl in reverse as well.
Tall Kneeling Position
Tall kneeling is a position you can hold for time or from which you can perform other exercises like an overhead press. The benefit of the tall kneeling position is that it helps you to create tension throughout the back of the legs and hips and core so that your torso is rigid and your posture stays upright. The tension in this position is similar to the tension needed for a strong plank but the upright position makes it easier to learn.
Kneel down with both knees on the ground
Tuck your toes under behind yourself
Stay upright and tall through the crown of the head with tension through the legs and abdominal muscles

You can use this position as an active recover position and even make it a little more challenging by placing the hands behind the head. This is also a great position to practice, chopping, overhead pressing, or use a cable machine or bands for rowing motions. Incorporating this stance for exercises will help to improve your core and torso rigidity in the push up.
Bench Press/Chest Press
The bench press or a chest press machine work similar pressing motions to the push up, but will not teach you to keep the core tight as needed for the movement. However, they are still great compound exercises for improving the strength of your chest arms and shoulders for the push up.
Tricep Extension
You can’t get the push in push up without strong tricep triceps. If you’re able to keep your core tight and elbows in a good position, but you just can’t press your way back up to the starting position, tricep extensions are a great supplemental exercise to continue improving your arm strength to help with the push up. You can use barbells, dumbbells, cables, bands or machines for a large variety of tricep extension exercises. Include these exercises toward the end of a workout after you’ve practiced larger compound movements and other skills that help with your push up form.
A Push Up Training Plan
In order to train for your first push up you will need to treat it like a skill. Practice it every day, while fresh, and with focus. It’s ok to get fatigued from your practice, but don’t chase fatigue as the end goal of a workout. Your goal should be to practice the repetitions of the exercises with impeccable form, making them progressively more challenging week after week.
Start by choosing an object or surface that allows you to begin doing around 5-10 elevated push ups with decent form. Begin practicing 20-30 total repetitions without going to failure each day. You can break it up into 5 or 6 sets if you need to and they can be done throughout the day. Daily practice will help you to learn the motor skills of push ups just like daily practice can help you learn to speak another language, play an instrument, or do math better.
Once you are practicing elevated push ups daily determine if you need to work on a particular aspect of your push up (weak droopy midsection or flared elbows). Pick 2-3 exercises discussed for that problem and incorporate them into your regular workouts 2-4 days per week.

Click the button below to get your free push up workout plan
In addition to exercises to specifically improve your push up, include compound movements for the entire body like upper body pulling movements, upper body pressing movements, squats, deadlifts, and lunges. This will ensure that your workouts are training your entire body to develop total body strength and coordination. Enter your name and email above and I’ll send you a weekly training plan to get from doing elevated push ups to doing your first push ups from the ground.
Now Go Do Push Ups
Getting the push up set up right takes care of a lot of the most common issues for people getting started with more push ups. If you’ve got good tension from your legs, core and shoulders, start doing push ups from an elevated position daily and you’ll be able to gradually move to lower positions over time.
Once you’ve worked your way down to doing your first push up on the ground continue to practice them daily in small chunks until you can do more than one. Usually at this point most people progress fairly rapidly. When you get closer to 10 push ups there is a world of push up variations you can incorporate to your workouts to make things more challenging and interesting.
Now start practicing each day. If you have questions feel free to reach out with an email. If this guide is helpful take a moment to share it or download the Push Up Training plan above and join the Strong Made Simple newsletter. I’ll send you more tips on getting the most out of your workouts for practical strength and sustainable results.