
If you’re looking to get stronger and fitter, the first advice you often hear is to start moving more and lifting weights. This isn’t bad advice, but some of the best exercises I know aren’t “moves” at all. And they don’t need weights! Isometric exercises are exercises where you create tension in a muscle without changing its length, and when you keep the angle of the joints the same against resistance. AKA not moving! The first thing that often comes to mind for people is a plank or a wall sit, but there are so many more options than those two.
These types of exercises are great additions to your workout routine because they help increase coordination, stability, and strength. I wrote about some of my favorites isometrics for improving posture for the American Council on Exercise.
However, they’re often neglected because they don’t necessarily provide any immediate feedback like increasing weight on a bar or performing more reps. Nonetheless, isometric movements can do a great deal to help your other big movements like squats, deadlifts, presses and chin-ups feel much better. Try incorporating some of the following isometric exercises into your workouts and take note of how much better and stronger the related and bigger movements begin to feel.
CLICK THE BUTTON BELOW FOR A FREE WORKOUT GUIDE AND ADD YOUR FAVORITE ISometric EXERCISES. ↓↓↓
Shoulder and Upper Back Exercises

Batwing
Stand with your back to a wall six to twelve inches away. Pinch your shoulders and elbows back, brace your midsection, and lean back to support your weight with your elbows against the wall. This is a great exercise to strengthen your rhomboids and other muscles of your upper back that help with pulling and posture.

Prisoner Position Anything
Place your hands behind your head like a prisoner and hold your elbows open wide to the sides. Do this actively on its own or while you do any other lower body exercises like squats and lunges and you’ll begin to feel the upper back and shoulders become more engaged. The prisoner hold is another great way to incorporate more of the middle and upper back muscles isometrically.
“YTWI” to a Wall or Floor
Lie face down on the floor or stand with your back against the wall. Either lift the palms or press back with the back of the hands for 10-30 seconds at a time while making each shape with your arms and body. Y is the arms apart and overhead. T is straight out to the sides. W is with the elbows pulled down so your thumbs are at about your earholes. I’s are trickier with your hands down at your sides by your pockets with the thumbs pointed out. Press back or lift from the thumb side. All of these are great for improving the strength and stability of your shoulders and upper back.
Chin up/Pull Up Hang
If you want to do chin-ups or pull-ups you better be able to hang. Simply grab an overhead bar tightly, lift your feet, and hold on. Try to gradually increase the duration over time. Keep the upper back more engaged by pulling your shoulders down away from your ears with the armpits (latissimus dorsi). If this is too challenging to start, or if you are especially tight through the shoulders, leave your feet on the floor and try to support as much weight as you can handle for 20 seconds through your arms. These are fantastic because they strengthen the muscles and connective tissues in their longest positions where they are often weakest.
Chin Up or Pull Up Hold
Instead of hanging from the bottom position, jump or set yourself up so you are holding your chin over the bar and lift your feet up. As you hold yourself over the bar for time, focus on pulling your elbows toward the floor, keeping your body tight from your toes to your abs, and breathing. Increase the duration of each hold week after week and you’ll notice your chin up or pull up strength improving as well. Most likely your deadlift will improve as well if grip or upper back strength is a limiting factor.

Push Up Bottom Position Hold
Get yourself into a push-up position and lower yourself to a position closer to the floor and stop. Hold this position for 10-30 seconds. You can use different hand positions or even work at higher positions from the floor as you get more fatigued. If you plan to press yourself back up each time, pause for 1-10 seconds each repetition. You should expect to do much less than you normally would and anticipate a new kind of pec soreness.

Dip/Parallette Hold
From a set of dip bars, parallettes, or even dumbbells, press and hold yourself as high as you can through the shoulders. Your feet can be off the ground or on the ground for somewhat less of a challenge. Keep squeezing down through the upper back, keeping the shoulder down and away from the ears. Start with 10 seconds and increase your duration up to 30 or even 60 seconds. These holds are great for strengthening the muscles that keep our shoulders stable and set through other pressing movements.

Isometric Prayer Squeeze
Place your palms together in front of the chest as if you’re praying, and then press them together tightly by squeezing your chest and shoulder muscles. Hold for 20-60 seconds at a time and remember to breathe. You can change the position of your hands to be higher or lower and closer to the chest or farther away in order to increase or decrease the difficulty of the movement.
Hand Press
Place the hands out in front of the chest one on top of the other so that the top palm is on the back of the bottom hand. Press the hands together tightly and keep the shoulder down away from the ears. This squeeze helps engage the latissimus dorsi and braces the muscles of the upper back and core. You can do it on its own or combine it with glute bridges or abdominal exercises where you are lying face-up on your back. The additional isometric contraction and bracing will help you to brace through your entire trunk and get a more forceful contraction in your glutes and abs during other exercises.
Isometric Core and Abdominal Exercises

Supine Knee Tuck
Lie on your back with your hands at your sides and your legs straight out. Pick your feet up and pull your knees up toward your chest as high as you can keeping your feet close to your buttocks. If you can keep the pelvis curled under, keep your abs tightened to keep your pelvis lifted just off the floor. Hold this position for 10 to 60 seconds.
For an additional challenge, place your hands on the floor over your head. If you can maintain that, try slowly extending one leg at a time back out without touching the floor for the duration of the hold and alternating sides.
This a great exercise to strengthen the abs and to help you brace and support your pelvis from the front for good posture while standing, sitting, squatting, deadlifting and more.

Dead Bug
Lie on your back with your hands up, your knees up, and your feet off the ground. Keeping the low back pressed lightly to the ground and the abs tightened, extend one arm slightly back overhead while simultaneously extending the opposite leg out. Don’t extend all the way, just go as far as it takes to feel the challenge in your midsection without arching your back up and away from the floor. Hold this position and count breaths in and out. Start with a single breath and return to the starting position. As you get stronger and more confident, increase the number of breaths you hold the extended position for and increase the distance you extend the arm and leg. Start with 5 repetitions for one breath and work your way up to 10 repetitions for 3 breaths per side.
The dead bug is a fantastic exercise for building core strength to reduce back pain for some. You can also adjust it and try lots of variations like leaving one foot on the floor or both hands on the floor, or extending the arm and leg on the same side.

Hollow Holds
Once you’re doing well with the dead bug listed above you can try moving on to hollow holds. Start off with the hollow hold by lying face up with your hands and feet in the air. Cross and squeeze your ankles together and stack and press your hands together. Extend the legs out and the arms overhead, keeping your back rounded and pressed to the ground. Hold this position, breathe, and continue to squeeze the hands and ankles together. I recommend starting at 10 seconds and building your way up to a minute. ou should count your breaths, focusing on exhaling fully each time. This one is a doozy and much harder than it may look. Make sure you’re doing well with dead bugs before moving on to the hollow hold.
Plank
The plank is the OG isometric exercise of all internet challenges. It’s still an awesome exercise for building core strength that helps you resist movement in your trunk, but it’s also great for incorporating the shoulders, legs, inner thighs, and glutes to create a stiff body from toes to shoulders.
There are countless variations to go through, but we’ll focus on the standard plank from the forearms. Don’t just get into a plank position and hangout, make this exercise the best it can be by placing your palms flat on the floor and actively pulling back against it. Press up through the elbows. Don’t let your low back arch down. And make sure to squeeze your legs, butt, and inner thighs so they’re tight. Create tension from your head to your toe in order to have a more impactful plank. Follow these cues and do your best to breathe in and out while keeping everything tight. A full effort plank may only last 10-30 seconds, and that’s great if you were increasing the overall intensity and tension in your body.

Bird Dogs
Set yourself up with your hands and knees on the floor shoulder-width apart. Keep your toes tucked under, extend one arm overhead and the opposite leg behind you. Do not raise your leg up high, just extend it straight back with your toes pointed down to the floor. Your body should resemble a hunting dog that is alerting its owner to some prey. Hold this position and breathe for 10-30 seconds at a time. Do your best to keep your hips and torso squared up to the floor and your abs tight.

Side Plank
Instead of facing straight down to the ground while you plank, lie on your side to challenge everything to one side and resist bending sideways. Set your elbow directly under the shoulder and place your palm flat to the floor. You can stack your feet on top of each other, but for more stability place the top foot in front of the bottom foot so your legs are slightly split apart. Press the side of the feet against the floor to raise the hips, breathe, and hold. Build your sets up from 10 seconds to 60 seconds. Try to create tension from the feet all the way up through the hips, core, and shoulders to work the entire body. Once you can hold the side plank for 60 seconds you can begin adding in other movements like rowing, rotating through the top arm, or lifting the top leg off the ground.

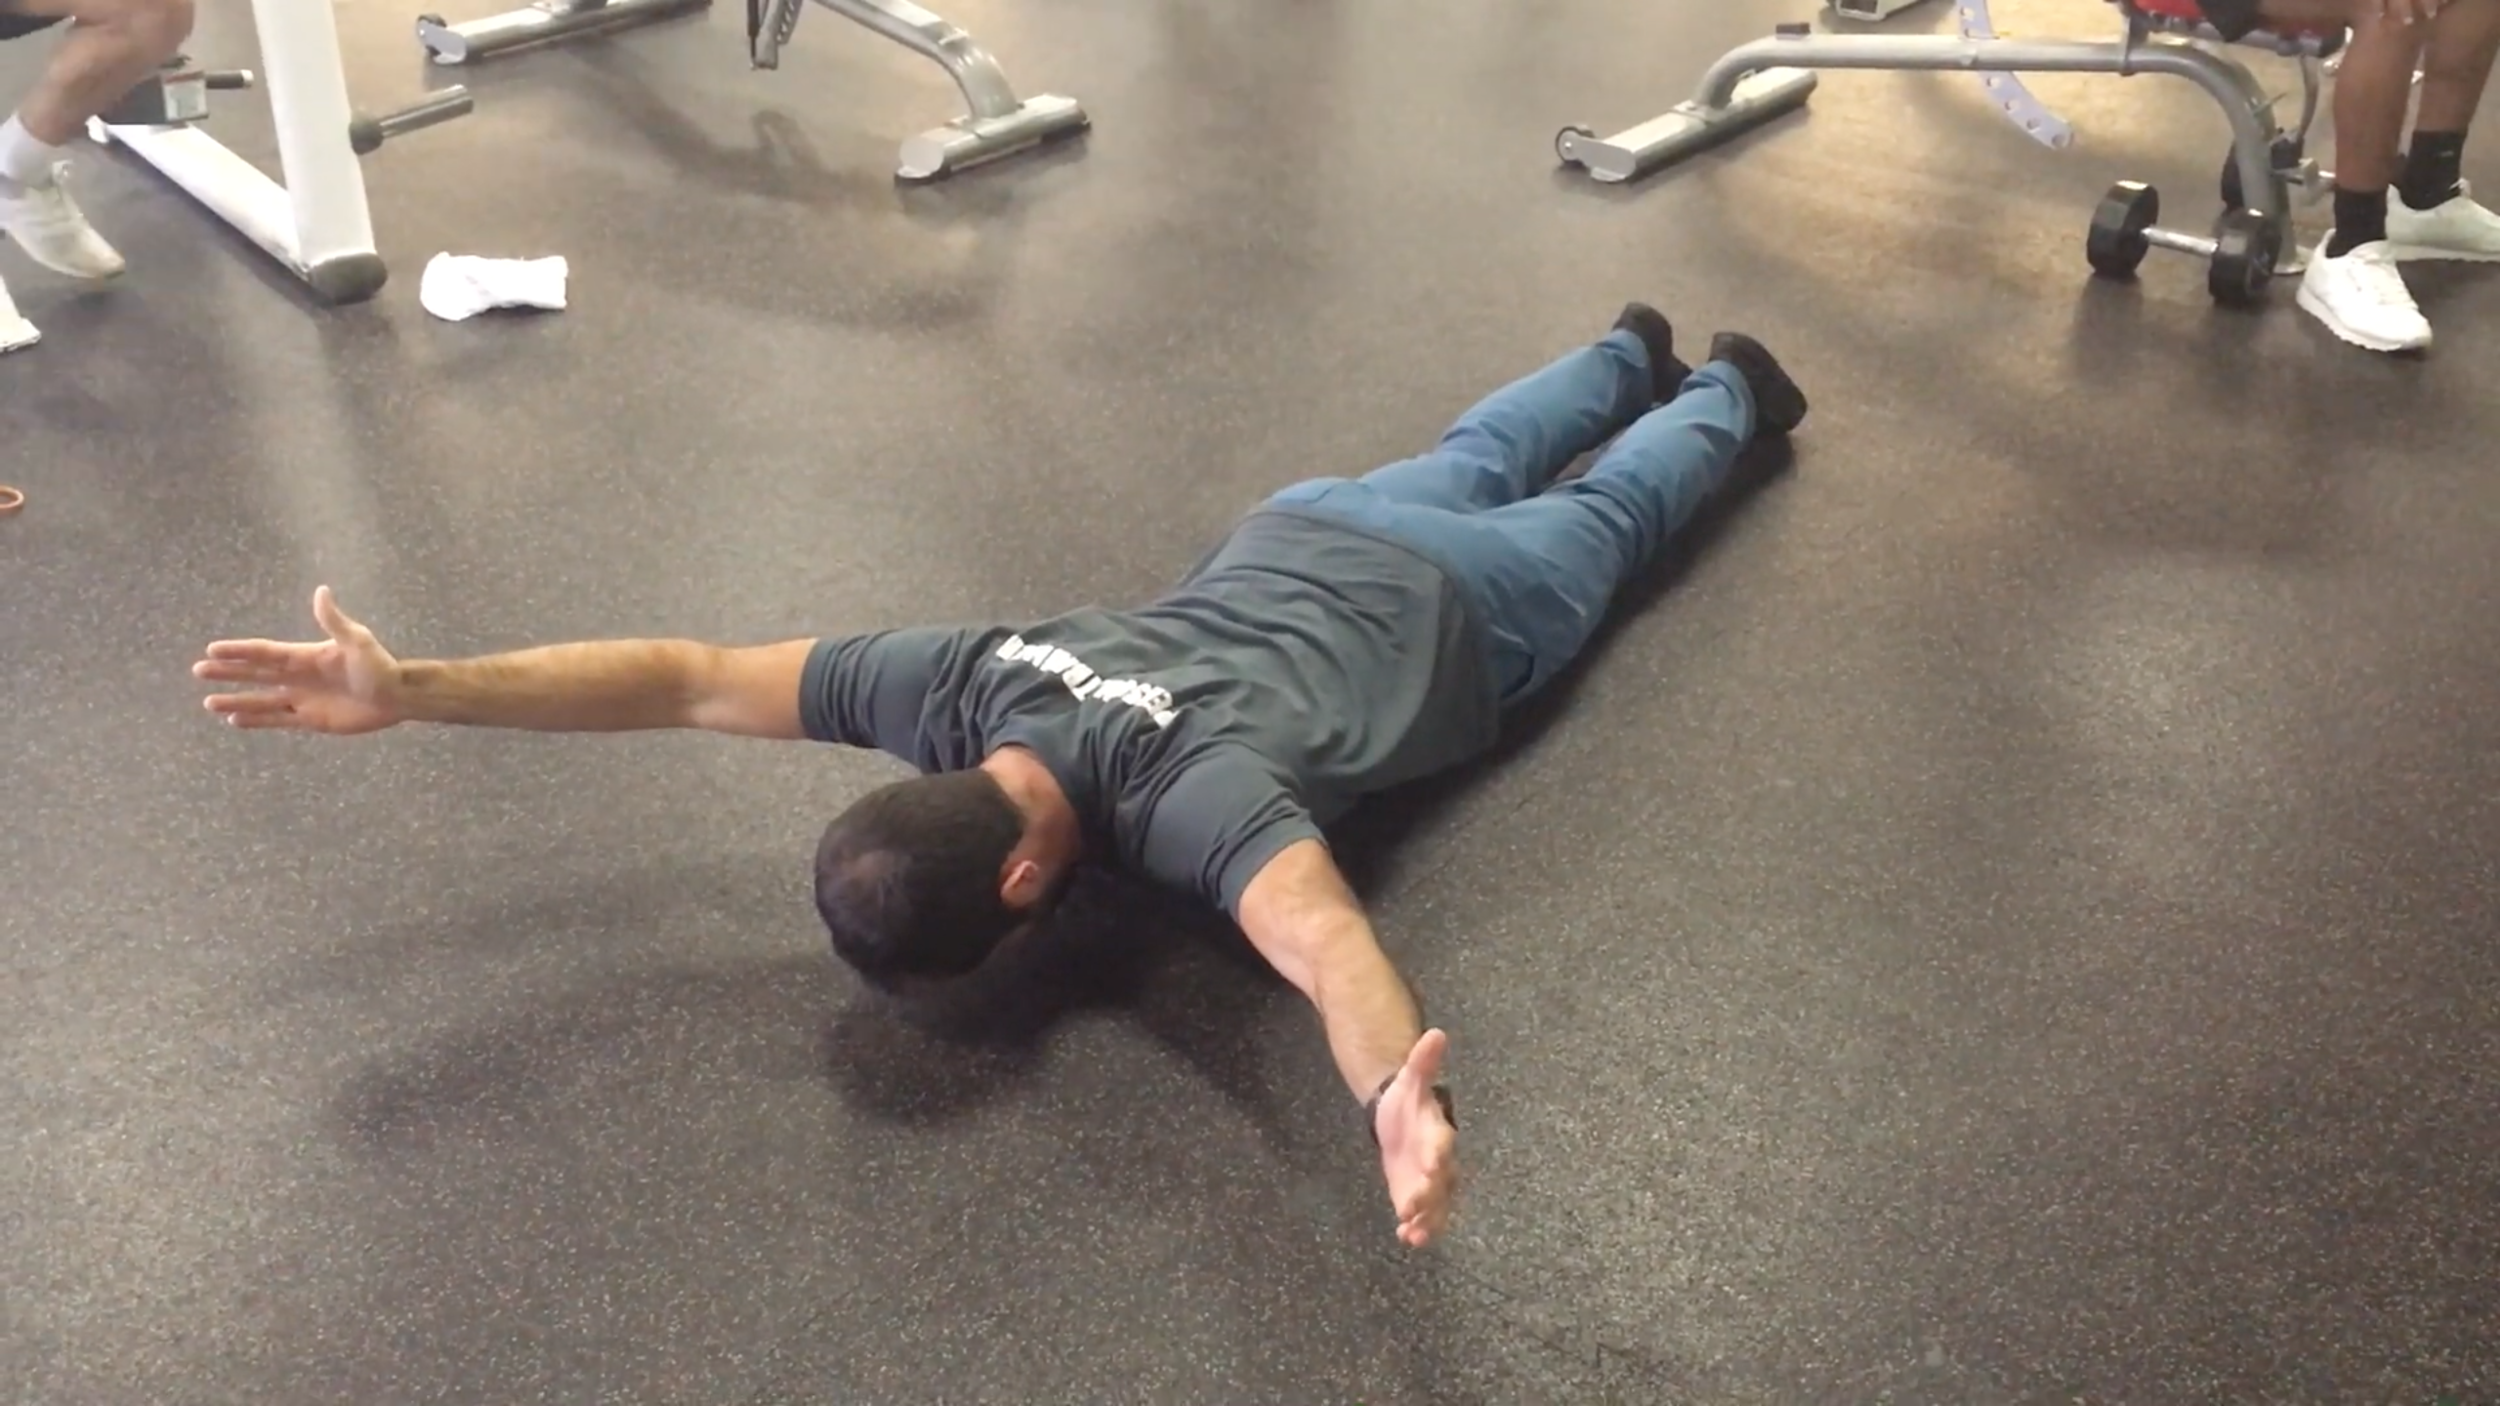
Superman
Lie face down on your stomach with your arms stretched out overhead and your toes and legs pointed straight behind you. Brace your abs and hold your feet and palms a few inches off the floor. Hold this position, keep your abs tight, and remember to breathe. Begin with a duration of 10 seconds at a time and build your way toward 60 seconds.

Pallof Press
This exercise uses a band or a cable so it’s not truly a bodyweight exercise. But it’s a damn good one, so it made the list. Throw a band in your travel bag and you can do this anywhere. It’s a great way to increase your core strength and stability by resisting rotation in your torso.
Attach a band or set a cable to about chest height. Stand perpendicular to the pulley or attachment, and pull the handle to your chest so that it is pulling you to the side. Extend your arms and the handle out in front of your chest without letting your torso rotate toward the attachment. Keep your abs tight and braced for 10-60s depending on the intensity of the load. You can also perform repetitions of this for shorter holds, by pressing the handle out and then back into your chest.

Tall Kneeling Anything
Tall kneeling is a position where you set both knees down to the ground with your toes tucked behind you. From this position extend yourself up as tall as possible by squeezing through your glutes and abs and reaching up through the crown of your head. Hold yourself here for 20 seconds to up to 2 minutes at a time.
This is a great way to challenge all of the muscles that get tight and weak from lots of sitting. You could also combine this position with the prisoner position to incorporate the muscles of the upper back and shoulders for super posture-training whammy. Cable rows, pallof presses, or overhead pressing can be a great addition to tall kneeling as well.
Isometrics For Legs and Lower Body
Isometric Hamstring Curl
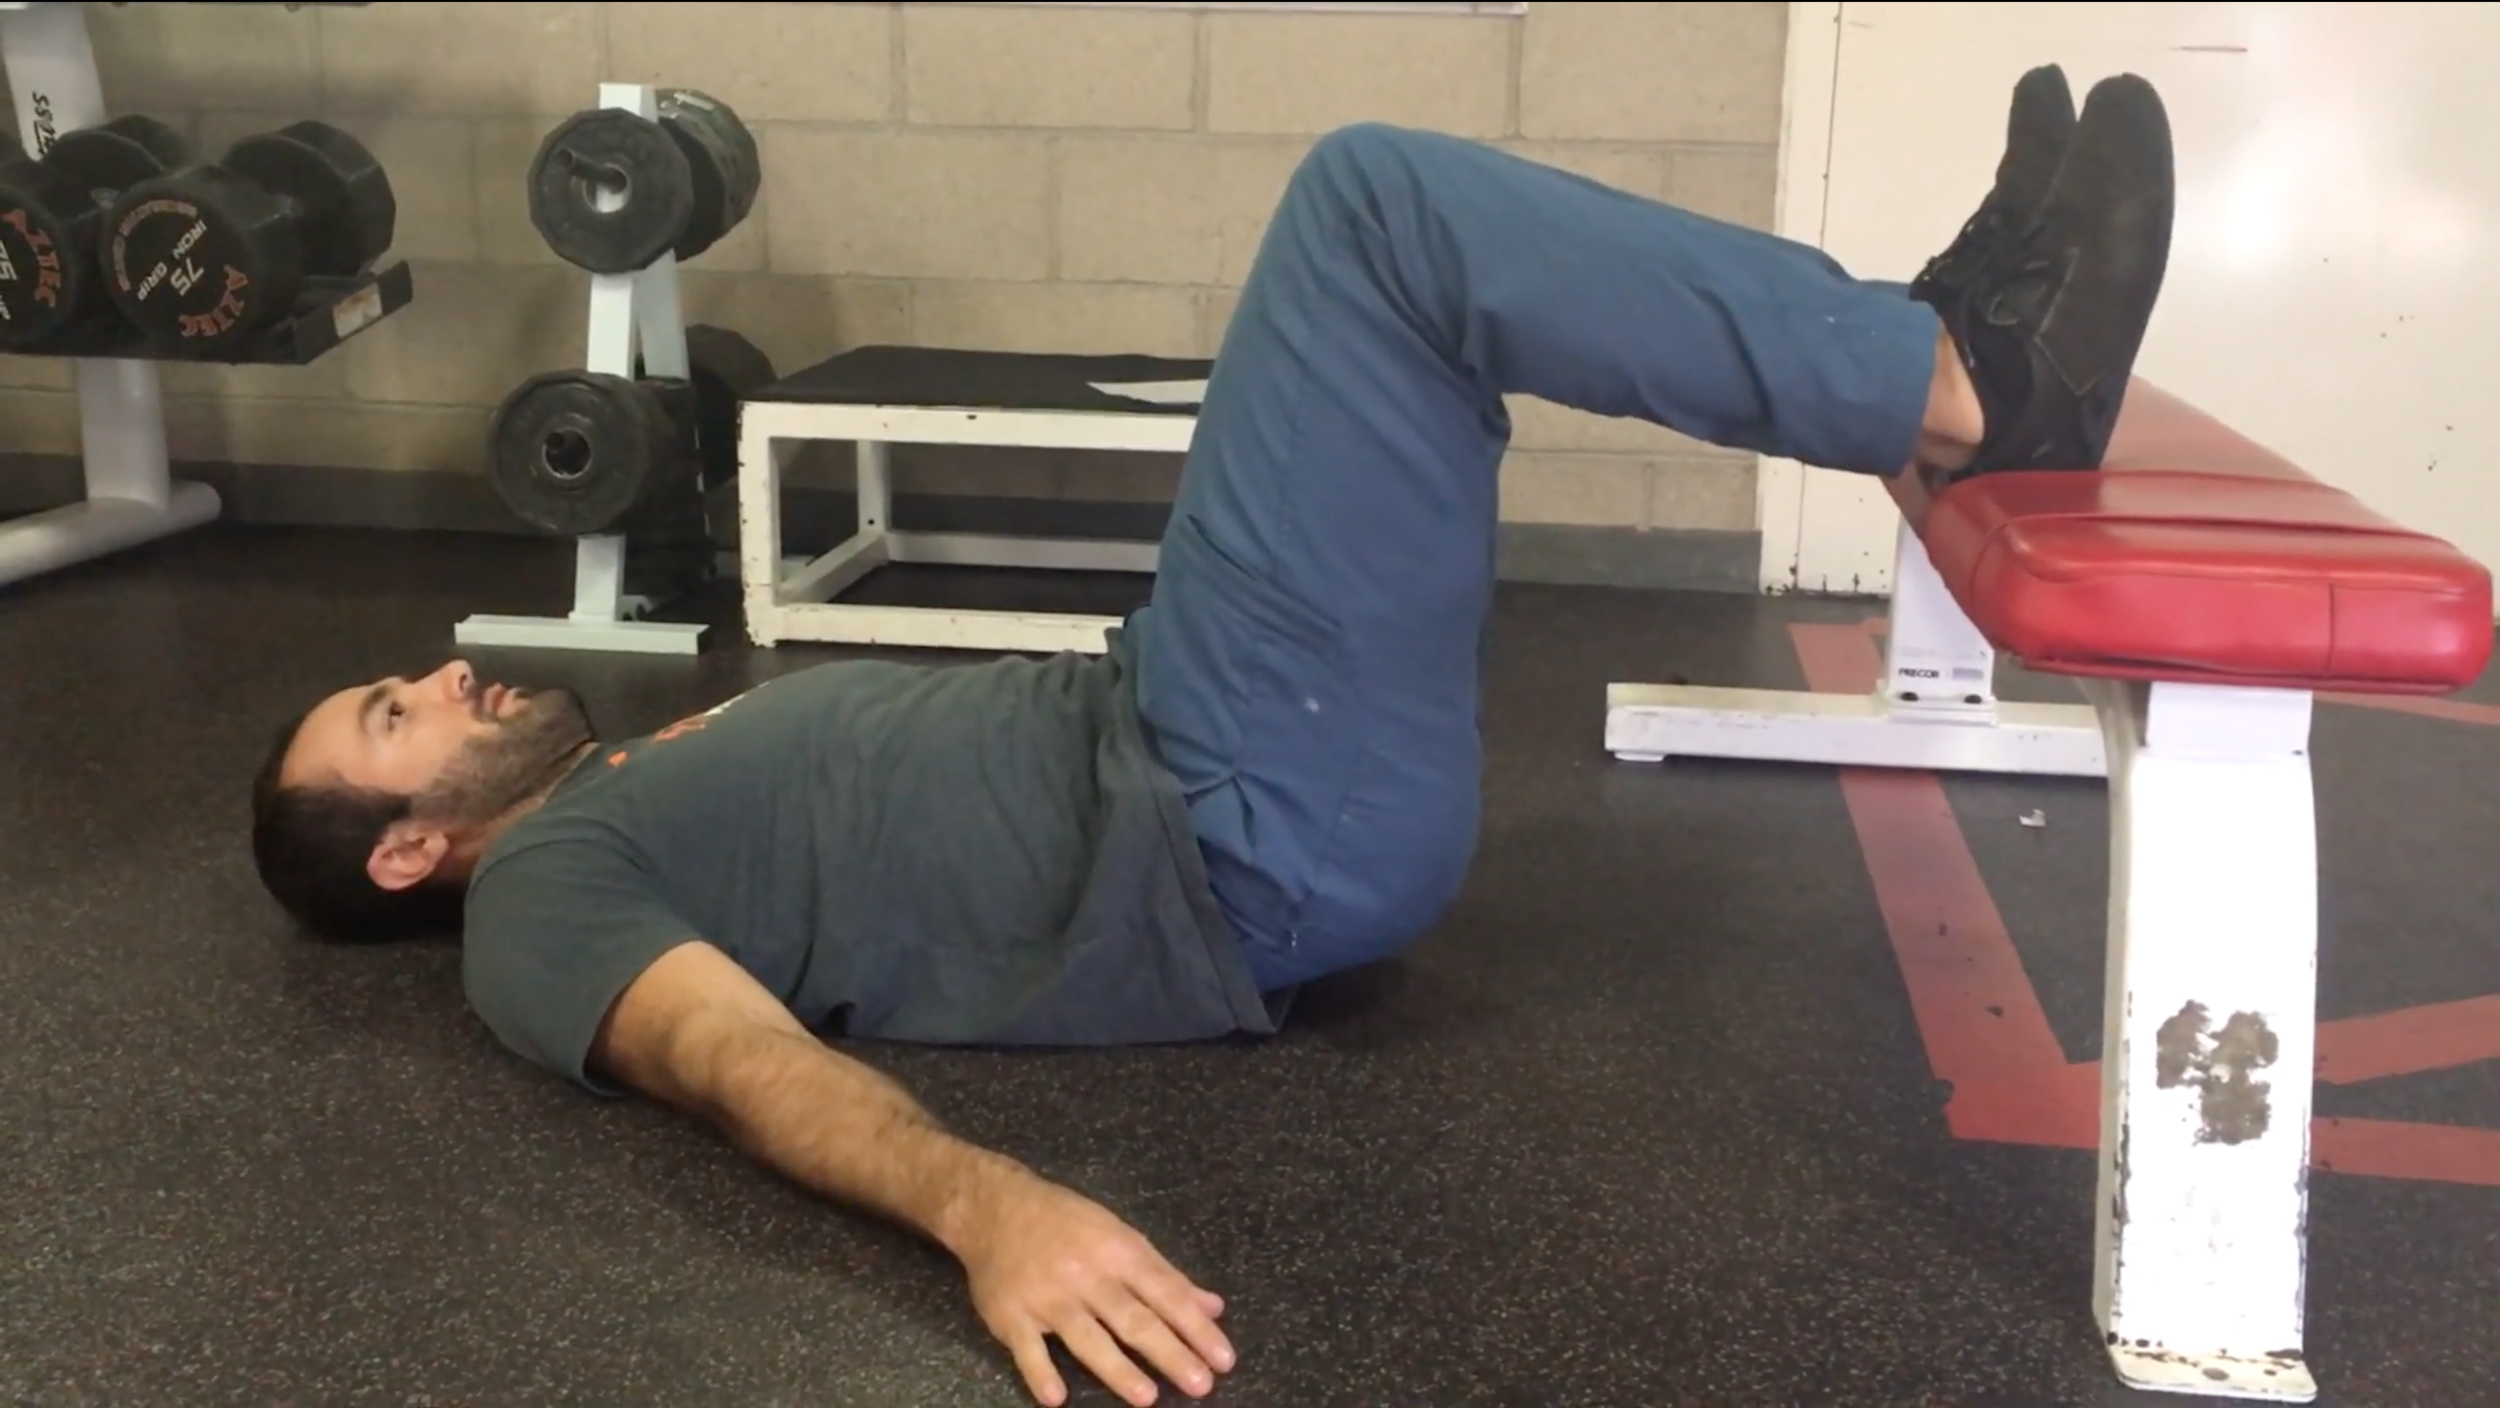
While lying on your back place your heels on top of a box or bench that is about 12-18 inches high. This should place your knees close to a 90-degree angle, but it doesn’t have to be exact. Pull back slightly against the heels so your pelvis scoops under and your low back is pressed flat to the floor. Hold this position for 20-60 seconds. Don’t try to bridge way up into the air. It may not seem challenging at first, but this is a great way to activate your hamstrings so they provide more stability at the knee. This is a great exercise for achy knees or even a tight lower back. You can also progress to doing a single leg at a time by pointing one foot straight in the air.
Or, in the absence of a box or bench, sit up on the floor with one leg straight and one knee up. Pull back against the floor with the heel of the bent leg for 20-60 seconds at a time and then switch sides.

Glute Bridge
Lie face-up on the floor with your knees up at 90 degrees and your feet flat on the floor, shoulder-width apart. Tilt your pelvis back so you scoop the tailbone under, and then squeeze your glutes to lift the hip bones up into the air. Hold this position and breathe. Start with a shorter duration of 20 seconds and build your way up to a full minute.
Incorporate the hand press mentioned above for additional tension and challenge, but remember to breathe!

Single-Leg Hip Thrust
Sit on the floor perpendicular to a bench so the back of your shoulders rests against it. Place your feet flat on the floor less than shoulder-width apart and 12 inches from your butt. Scoop the pelvis and bridge up so that your shoulders and head rest flat on top of the bench. Your shins should be close to vertical. Extend one leg off the floor and squeeze the glutes. Hold this top position for up to a minute while remembering to breathe and keeping your hips level without twisting to the side.
This is another great exercise to incorporate the hand squeeze isometric for greater tension and challenge.
March Hold
Stand on one leg leaning forward very slightly. Keep the abs engaged and lift your knee as high as you can. Try to aim for above your belt line. Breathe and stay tight through the midsection. Start with short holds of 1-5 seconds and alternate sides, marching slowly in place. Once you are feeling better and more balanced with the exercise you can hold one side at a time for 20-30 seconds at a time. This exercise is great for building balance and stability from the feet up into the hips, as well as to strengthen the hip flexors.
For an added challenge, place yourself in the prisoner position while performing this exercise, but keep the abs tight so that the rib cage doesn’t flair out.
Calf Raise
Start from the floor or with the balls of the feet and toes on an elevated surface. Press your heels up into the air and hold for 20-60 seconds. You can use a post to balance if needed.
Try using different foot positions by turning your toes in or out. Make it more challenging by standing on one leg only.
These are great for increasing the strength of the feet, ankles, and calves.
Split Squat Hold
From a standing position, step back with one foot and lower your knee so that it is a few inches off the floor and behind the heel of the front foot. Maintain your weight predominantly over the front leg and hold this position for 10-30 seconds. Let your knee come down to the floor gently and reset to the other side. Alternatively, you can press back up into the top position after holding the bottom position and do this for sets of multiple reps.
If you feel discomfort in the back knee try to lean forward more and try to keep more of your weight over the front foot.

45 degree Back Extension
This exercise should probably be called glute extension in order to help people do it better. Set yourself into the back extension apparatus at your gym so your feet and hips are held in place. Instead of trying to think about your back, focus on squeezing your abs tight and clenching your glutes to raise your body up to a straight line. Squeeze and hold this position. Your eyes should still be looking down at the floor. If they are up and looking around the room you’re probably hyperextending the back. Start with 20 seconds and work up to a minute while remembering to breathe. Your booty should be burning, but your hamstrings, back, and abs will also be working to keep you in position.

Hip Adduction
Grab a yoga block and squeeze it between your legs to just above the knees to fire up your inner thighs. This helps keep your pelvis in a strong, neutral position and can be combined with lots of other exercises like glute bridges, planks, squats, push-ups or pull-ups.
To do it on its own, you can lie on your back with your feet shoulder-width apart and flat on the floor. Then squeeze a yoga block or other object between the legs as if you were training to crush a watermelon. Hold for 30-60 seconds at a time.

Bent Knee Side Plank
The side plank is often thought of as more of an oblique exercise, but curling the bottom leg back at the knee tends to challenge the adductors more. You can even raise the top leg in the air to make it even more challenging. Hold this position for 20-60 seconds at a time per side.

Wall Sit
If the plank is the OG of internet challenges, I think the wall sit is the OG of physical punishments. I can remember being forced to do them when I was lollygagging around in gym class.
Lean back against a wall with your heels about 18 inches out from the wall. Slide down until you are in a “seated” position and your knees are at about 90 degrees. Hold here for 20-60 seconds. You can try lower or higher knee angles to train the muscles around the knees in different positions, and even add other activities like ball throws. While these may seem like punishment, they are great for building resilience and stability in the knees.

Copenhagen Adductor Hold
Another side plank set up, but with this exercise, you will place your top leg on top of a bench. When you are ready, use the inner thigh of the top leg to press down on the bench and hold your body and bottom leg off the ground. Hold here for 10-60 seconds at a time.
This is a great way to challenge your adductors and has been shown to be an effective way to avoid groin strains for athletes like soccer players.
Start adding isometric exercises to your workouts
This list is big, but I’m sure there are lots of variations and exercises that could be added to it. Send me your suggestions and I’ll add them with a hat tip to you for your input.
Additionally, lots of these exercises can be combined with other exercises so that one part is isometric and another part is more dynamic. For example a glute bridge with a dumbbell floor press, or a split squat hold with a 1 arm cable row. The options go on and on and on.
Rather than trying to do all of these exercises all at once, begin by picking 2-4 of them and adding them into your current workout routines. Any of them would make great additions to the workouts in the Push Ups and Tacos ebook if you wanted to expand them. You can pair them with other exercises to keep yourself working between sets, put them into a warm-up, or add them as finishers. If your traveling, you now have a big list of exercises you can do with almost no equipment or space at all. Choose 3-5 of these exercises for a great hotel room workout. Start with the lower time or rep ranges and focus on control. Remember that in isometric exercises the goal is to stay stiff and rigid without moving, even if it challenges your balance. Happy flexing!

Add Isometric Exercises To The Workouts in Push Ups & Tacos .
Click the button below to receive your free ebook.